Microblading looks effortless when you scroll past perfect brows on social media, yet the work is only half done when you leave the studio. The real magic—or drama—plays out in your bathroom mirror during the weeks that follow. Knowing what is coming removes the fear, helps you protect your investment, and keeps you from picking at every flake of skin. In this post we will map out the entire microblading process, show you the science behind each phase, and flag the few signs that deserve real concern.
Skin Science 101: Why Your Face Treats Microblading Like an Emergency
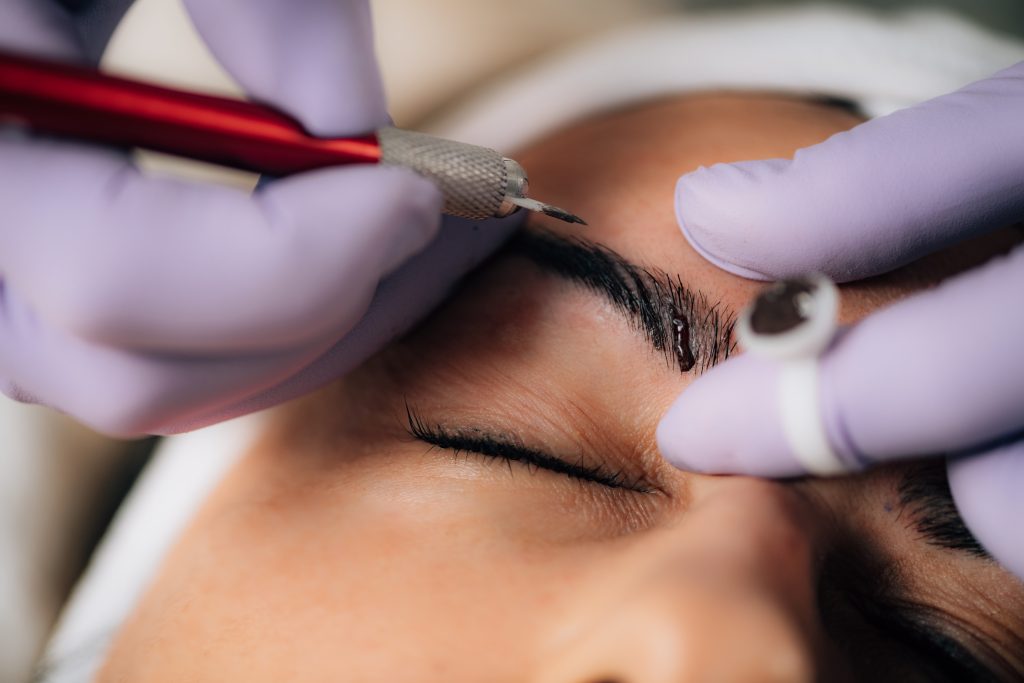
Microblading is a form of tattooing, so your body reads each stroke as a tiny cut that must be closed fast. Blood rushes in, plasma seeps out, and clotting factors form an invisible shield within minutes. Lymphatic fluid follows, flushing away debris but also making the skin look shiny and pale. Under the surface, fibroblasts start laying fresh collagen to seal the gap, while immune cells decide how much pigment will stay for good. Every odd color shift you see later traces back to this early alarm response.
Days 0-3: Shock, Swell, and Oxidize
The “Marker Brow” Effect
Right after the session your brows appear up to fifty percent darker and wider than you expected. That bold shade is pigment mixed with oxygen and a thin coat of dried plasma sitting on top of the skin. Swelling adds thickness, so each stroke spreads slightly, giving a felt-tip marker vibe. This dramatic look is temporary, yet it fuels most next-day panic texts to artists everywhere.
Managing Lymph Without Flooding the Pigment
For the first three days clear fluid will bubble to the surface, especially while you sleep. If the lymph dries there, it hardens into thick flakes that can rip color away later. Use a clean tissue or cotton pad dampened with sterile water to blot the area every hour or so on Day 1, then as needed on Days 2 and 3. Keep the movement gentle; rubbing stretches fragile skin and muddies fresh strokes.
Days 4-7: Crusts, Itches, and Tiny Triumphs
Scabs begin to form by Day 4, locking pigment under a rough shield. They may look like coffee grounds stuck in your brow hair, and they itch like a healing mosquito bite. Scratching tears the scab early and leaves a pale gap that no brow gel can fake. To soften the itch, many artists allow a rice-grain dot of aftercare ointment morning and night. Hydrated scabs lift more cleanly, reducing the risk of forced removal, but the skin should never look greasy. A light sheen is the goal.
Days 8-14: The Great Peel and the Ghost Brow Myth
Flake Season
Around the end of the first week the scabs dry, crack, and fall off in uneven chunks. The process resembles a peeling sunburn and feels just as annoying. Avoid the temptation to tug at an edge that is almost ready; natural shedding keeps strokes crisp. Wash your face gently, pat dry, and let gravity finish the job.
Disappearing Ink Panic
Once the flakes are gone many people think the procedure failed. The brows look milky, patchy, or even vanish under certain light. Fresh epidermis is cloudy and packed with white blood cells, so it hides pigment like frosted glass. Over the next few days that veil thins, and the color lurking beneath sneaks back into view. Patience beats panic every time during this stretch.
Days 15-30: Color Revival and Texture Normalization
By the third week the skin has sealed, the swelling is gone, and the true shade begins to bloom. Collagen remodeling tightens the strokes so they no longer appear fuzzy. At the same time iron oxides in the ink finish oxidizing, revealing the intended tone—neither ashy gray nor marker black. Lifestyle now takes center stage. Heavy sun exposure can warm the color to orange, while aggressive exfoliation can cool it to blue. A broad-spectrum SPF and mild cleansers keep the new brows safe.
Beyond One Month: The Touch-Up and Long-Term Maintenance
Perfecting Session Goals
Microblading is a two-step art. About six to eight weeks after the first appointment, the artist reassesses shape, density, and hue. Small voids appear where scabs fell too soon or oily skin pushed pigment out. During the perfecting session those gaps are filled, strokes reinforced, and undertones tweaked warmer or cooler if needed. This extra layer locks results in place for a year or more.
Brow Preservation Plan
Good habits extend the life of your brows far beyond the touch-up. Daily SPF on the brow bone prevents premature fading. Skip strong acids or retinol directly on the pigment; sweep those products around the area instead. Schedule an annual refresh if you love a sharp, hair-like finish, or wait up to eighteen months if you prefer a softer tint. Little choices every day decide whether your brows look fresh or dusty by next summer.
Red Flags vs. Normal Healing Signals
Mild redness, light flaking, and a soft itch are expected and fade on their own. Troubling signs include thick yellow pus, widening redness that feels hot, and pain that intensifies after Day 3. A sudden fever is another danger clue. If these symptoms appear, call your artist first for guidance, but do not hesitate to seek medical care. Early antibiotics can save both your health and your brows.
Rookie Mistakes That Undo Good Work
Sweating buckets in a spin class, steaming your face over pho, or wearing heavy foundation on Day 2 are quick ways to lighten pigment. If a slip happens, blot, cleanse, and apply aftercare ointment to calm the area. Then resume the rules: no soaking, no picking, and keep the brow zone clean and protected. A single mistake rarely ruins the result, but repeated ones absolutely will.
Conclusion
The microblading process does not end when the artist wipes away the final swab of ink. It continues for weeks as your skin defends, repairs, and finally accepts the new pigment. By understanding each stage shock, scab, ghost, and bloom you turn anxiety into confidence. Follow the aftercare, watch for true warning signs, and trust that the sharp strokes will resurface. Soon the mirror will show effortless brows that shave precious minutes off every morning, making the brief healing roller coaster more than worth the ride.