Microblading feels like magic the moment the mirror shows crisp new brows, yet the real work begins the second you leave the studio. The skin now holds thousands of tiny paper-cut wounds, and each one needs time, care, and patience. When you understand the microblading healing timeline, you swap anxiety for confidence and give the pigment its best chance to stay bold. In the next few minutes, you will walk through each stage in plain language, learn what is normal, and pick up simple tips that protect your investment.
Day 0: Fresh Ink and First Reactions
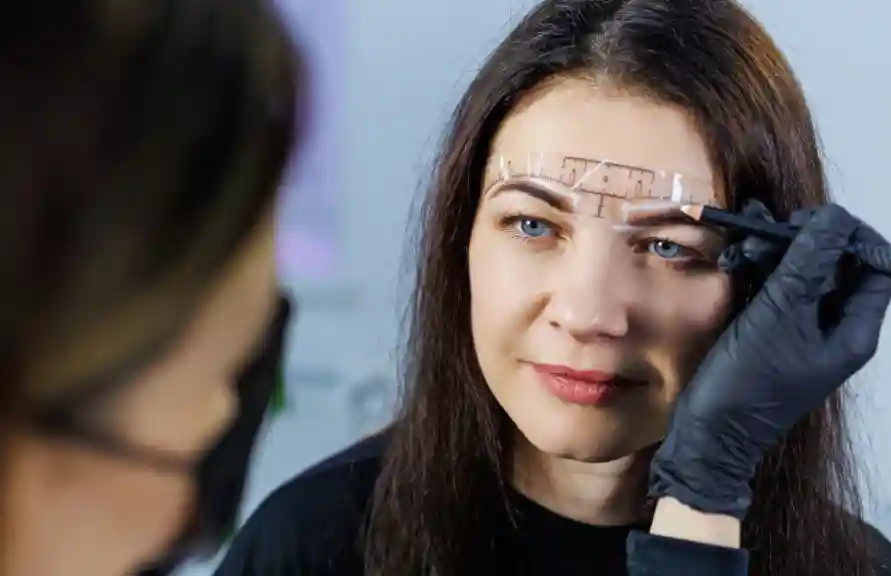
Right after the session, the brow area looks intense. Color appears darker, lines look wider, and the skin feels warm. This shock is caused by oxidized pigment, trapped lymph fluid, and mild swelling. The artist wipes the skin clean, but plasma seeps out within minutes and forms a shiny layer. Your only job tonight is to blot that clear fluid with a sterile pad every half hour. Gentle pressure stops thick scabs from forming and keeps strokes crisp. Avoid washing your face under the shower stream; a quick splash of lukewarm water around the brows is enough.
Days 1–3: The Marker-Brow Phase
Morning comes, and the pigment seems even bolder. Do not panic. The brow tissue is inflamed, and the color sits on top of the skin, so everything looks louder than life. Continue blotting any fluid, but reduce it to three or four times a day. Keep the area dry, skip makeup, and sleep on a clean pillowcase. The skin itches a little, yet rubbing or scratching will drive bacteria into open cuts. A light tap with the pad of your finger calms the urge without harm. Remember the goal during this window: protect the barrier and prevent infection while the foundation of microblading healing settles in.
Days 4–7: Itch, Scab, and Self-Control
By the fourth day a fragile crust starts to form. It feels like fine sand when you touch the brow hair, and the itching intensifies. This is the hardest stretch because your fingers crave a quick pick. Resist. When a scab lifts too early it takes pigment with it and leaves a pale gap that no brow gel can hide. If your artist allows ointment, use a rice-grain dot morning and night. The light moisture eases itching and keeps scabs flexible, so they fall away on their own schedule. Shower steam must stay low; let warm mist fog the bathroom, then step in only when water feels lukewarm.
Days 8–10: Flake City
The crust dries, cracks, and peels in uneven patches. Brows look messy, color appears spotty, and you may swear the procedure failed. This ugly-duckling stage is actually progress. Fresh epidermis pushes the scabs off like a snake shedding skin. Wash the face gently with pH-balanced soap, pat dry, and leave the flakes alone. They will drop while you sleep, read, or scroll on the couch. Your mirror may show bare spots; most of them are only hidden under cloudy new skin. True blanks will reveal themselves after the peeling ends, and they can be fixed at the touch-up.
Days 11–14: The Ghost Brow Illusion
When the last flake falls, many clients gasp because the brows seem to disappear. The new skin is opaque and milky, so it hides the ink like frosted glass. This soft veil clears a little each day, letting more color shine through. Do not chase lost pigment with brow pencils yet. Cosmetics clog healing pores and turn faint strokes into blurry smudges. Instead, focus on gentle skincare and sun avoidance. Ultraviolet light right now can shift the hue to orange or blue before it fully locks in.
Days 15–30: Bloom and Balance
During the third and fourth week, biology and art finally shake hands. Collagen remodels the wound, swelling fades, and the ink oxidizes to its intended shade. Strokes look finer, gaps become clearer, and the surface feels smooth again. You can now return to light workouts, but keep sweat minimal and blot immediately after exercise. Add broad-spectrum SPF around the brows, and be careful with exfoliating acids; slide them along the forehead but not directly on pigment. The hard part of microblading healing is over, yet small choices still decide how vivid the brows stay over time.
Week 6: The Perfecting Session
Microblading is designed as a two-step craft. At the six-week mark, meet your artist for the touch-up. They will inspect symmetry, reinforce any light strokes, and warm or cool the shade if your undertone changed. The skin is now stronger, so this shorter appointment feels easier than the first. After a brief repeat of days one through three, the brows settle for good and will last 12 to 18 months with smart care.
Long-Term Care for Lasting Color
Healthy habits keep brows sharp long after the calendar flips. Shield the area from midday sun, and wear a hat during long outdoor days. Switch to gentle gel cleansers, and avoid scrubs that contain walnut shells or other harsh grit. When using retinol or chemical peels, start an inch below the brow bone, then feather upward but never across the pigment. Schedule an annual refresh if you crave hair-stroke precision, or stretch to eighteen months for a softer powdered look.
Warning Signs You Shouldn’t Ignore
Most discomfort fades by week two, but some symptoms demand action. Spreading redness that feels hot, yellow pus, or sudden swelling after the third day all hint at infection. Severe pain that escalates overnight or a fever above 100°F means it is time to call both your artist and a healthcare provider. Early treatment protects your health and salvages the artwork.
Conclusion
Perfect brows are not born in the chair; they grow through patience and smart aftercare. When you respect each stage—bold ink, itchy scabs, ghost veils, and final bloom—you partner with your skin instead of fighting it. The microblading healing journey takes about a month, yet the payoff greets you every sunrise when you wake up ready to face the world without a brow pencil in sight. Follow the steps, trust the timeline, and enjoy the long stretch of effortless beauty that follows.
Frequently Asked Questions
1. How long before I can wash my face normally after microblading? Most artists ask you to keep the brow area dry for the first seven to ten days, depending on their aftercare method. That means no direct water pressure, steam, or cleanser on the brows. You can splash lukewarm water around the face and use micellar water on cotton pads for any makeup removal during this window.
2. Is scabbing always normal during microblading healing? Yes, light scabbing or flaking is a standard part of the healing cycle because the skin must seal each micro-cut. The crust usually feels like grains of sand and lifts off between days five and ten. Thick, oozing scabs, however, suggest improper aftercare or infection and require a quick check-in with your artist.
3. Can I work out while my brows are healing? Sweat is salty, and salt pulls pigment from healing wounds, so high-intensity workouts are off-limits for at least a week. Light walks or gentle yoga are fine if you keep facial sweating minimal and blot any moisture immediately. After day ten, you can ease back into full training, but still wipe and cleanse promptly.
4. Why does the color sometimes heal lighter than expected? Several factors can dilute pigment during recovery, including oily skin, premature scab removal, over-application of ointment, and heavy sun exposure. Each reduces how much color the dermis retains, making the healed result look softer or patchier. The scheduled touch-up lets your artist reinforce missing strokes and adjust the formula for longer wear.
5. When should I consider an annual color boost? Most clients book a color boost twelve to eighteen months after the perfecting session, once strokes start appearing muted or powdery. Lifestyle influences timing: frequent sun, chemical peels, and oily complexions fade pigment faster. If brow makeup is creeping back into your routine, that is the sign it’s time to refresh.